Data Structures Pt.4: “Linked Lists”
If you are in the process of your job search and job interviews, I am sure you’ve come across the word Data Structures. What are they and how can we use them in our daily programming. I’ve started a blog series on Data Structures, touching on a different type each week. We will be using Javascript as the programming language as we dive into Data Structures. Last time we discussed Queues and Stacks, this time we will talk about Linked Lists, so let’s get started.
What are Data Structures? Data structures are all about runtime complexity, and there are two main things we need to know. Data structures are ways of organizing information with optimal ‘runtime complexity’ for adding and or removing records. Second, Javascript implements several data structures, but you will be asked about ‘inferior’ data structures, as well.
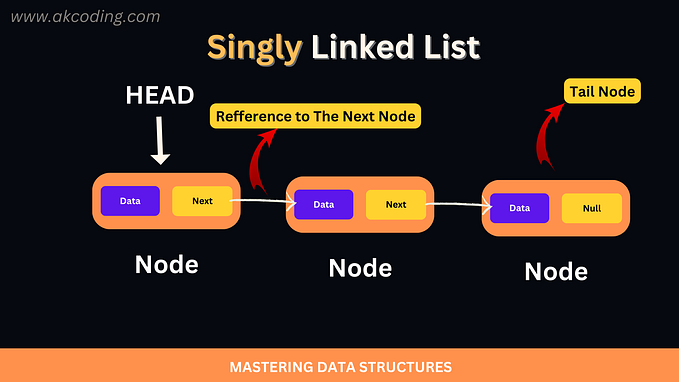
What is a Linked List? A linked list is an ordered collection of data, which contains several different nodes, also referenced to as a chain. In every linked list there are two special nodes, The Head (always the first node), and the Tail node (always the last node). As shown in the diagram every node holds a bucket of sorts, that contains the data such as a string, number, array, object, etc. Each node contains some amount of data with a reference to the next node so that the order is always maintained. What is a reference? A reference is an explicit method we call on a single data node to link them together by using the keyword .next. So in short a Linked listed is taking two forms of data and linking them together in some convention.

Creating a Linked List:
Node Class: We will stick to our convention of making Data Structures out of classes, for sake of the interview process. As before we will start with two classes, a node class, and a linked list class. Starting with the Node class, we can start with implementing our only function which is the constructor method. The constructor takes in two properties data, and next, in the case that there isn’t a next node passed in, we can default next to null. And that’s it for our Node class.

LinkedList Class: Next for our LinkedList class, it will contain more methods that make working with a linked list very easy, such as insert, or look for. There will only be one property of the linked list class which is the head node, which in turn references to the other nodes. So in actually the Linked List class is only aware of the head node and has to crawl over the other nodes to access their data, to obtain the information. By default, we want to start our constructor method with a head node that’s equal too null, as no information is passed to it yet.

Insert Method: Moving on to our methods, it’s only natural to start with an insert of data. we can do this by passing in a form of data and setting it to a new instance of Node class.

Size Method: Now our size method, is a little more complex but, we will be using it later in our Get methods. As you can see from the code, we are looping through our linked list, with a while loop, a node at a time. Finally we will set node to the next node and return it.

Get First Method: Getting the first node is very simple as we simply return this.head, because the head is always our first node.

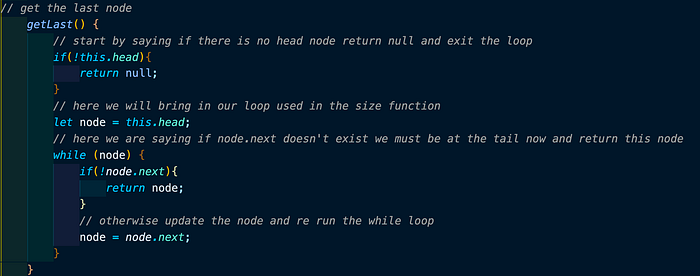
Get Last Method: This method is a little more tricky as we have to bring a loopback in, to find the last or tail node. we start by saying if there is no Head, then simply exit the loop. Then if the node we passed in has no next node, simply return that node because it’s the tail. Otherwise, update the node and run again.
Clear Method: Now because our linked list is only aware of the head null, by setting head to null, we are simply destroying and clearing the linked list we created of nodes.

Get At Method: With our get at method, we want to find a node at a certain spot by giving the function a parameter of the index we want to find. We will create a counter for our loop to compare to the index and if it matches return that node, if not update the counter and reassign the node to the next slot and rerun. Last if we are trying to find an index that doesn’t exist in our linked list we add a return null to the very ends. Stating if no head or tail indexes were found we have nothing to report.

Calling our LinkedList: Remember we want to start by creating an instance of a Node class for some data to work with. you can create a new node instance and add it to the list (as shown in my console), but remember our insertFirst method instantiates a new object of the node for us. As expected when we call our list from scratch it returns head as null. Now we can add a node to our linked list by calling the insertFirst Method, and giving it some data. From the Linked List Node tree we can see we are pushing data in as the head that refers to the next node.

Here in our second screenshot, we make use of our getAt Method to show our node at the index we passed in. Finally, we can clear the list of its head node, and we can see when we call the list it returns with our default with a head as null.

Congratulations we have successfully made our very own linked list. while it is a bit more difficult than our previous Data Structures, but I hope I did a grand job of explaining it. Next, we will take our linked lists a step further and talk about circular lists, stay tuned.